Ever since I got a Canon Rebel as my Christmas present last year, I’ve been trying and trying to take better photos. While a fancy camera is nice, it doesn’t do all the work for you. And better lenses can cost anywhere from $100 into the thousands. Being a student 9 months out of the year and having an awesome but unpaid internship over the Summer, I’m on the lookout for anything cheap that enhances photo. Since I’ve started using these(all under $20!), I’ve had a few photos accepted onto Foodgawker and Tastespotting—proof that you don’t need all the bells and whistles for your photos to get noticed.
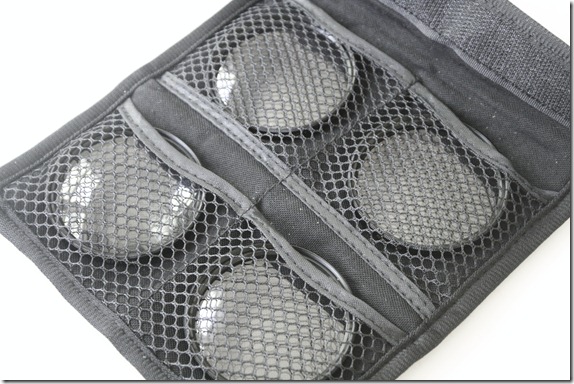
1. Close-Up Macro Filter Lenses: $10.49
These are perfect for the person who has just bought the fancy $500 camera and doesn’t want to pay anymore for specialty lenses. I first learned about these from Caroline who takes amazing food photos and hoped that buying them would help me take pictures half as good as hers.
Each lens magnifies a certain amount: x1, x2, x4, and x10. They can also be stacked on one another for even more magnification, so for instance you could make a x15 by stacking the x1, x4, and x10 lenses. It can be hard to focus the camera with them on, but if you’re patient they’re good for close-up shots of food. And for the price they’re really quite a bargain.
2. Dollar Store Placemats: $1
I’ve been trying to get better about adding props to my photos and the easiest one so far to master has been the placemat. Picking a background in contrast with the food will make it stand out more. Since I didn’t want to break the bank, I went to the dollar store. I didn’t keep track of how much I spent, but I see 5 placemats, so I’m going to go out on a limb and say I paid $5. That certainly sounds like a reasonable deal to me.
3. White/Grey Posterboard: $.10-.99
Another easy and cheap background is posterboard, which you can find at any CVS in the crafts aisle. White is a favorite color for food bloggers because it draws no attention, putting the spotlight solely on the food. You can use it as a background or, like the placemats, underneath as a surface.
Another tip the photo editor at a newspaper I take pictures for told me is to use a slightly grey-toned paper to set a camera’s white balance under natural light to get truer colors. Jessica does a great job at making colors pop with a grey background.
4. Natural Lighting: Free
We all know lighting is important. Last December I made a light-box specifically for it. But there’s NO reason to pay a penny for it, especially during the Summer when the sun’s out until 8pm anyway. Natural lighting provides for the best food photos, which is why anything you can buy at a hardware store tries to replicate it.
Take advantage of it whenever and wherever possible. And I truly mean “wherever”; if the best lighting in your house is in the spare bedroom, take the plate of food and camera there. You might feel silly at the time, but with a close-up no one will be able to tell the location anyway. And you can always crop the bed out of the background; I’ve done that.
What are your cheap photography tips and tricks?


The poster board is GENIUS, I tried using a towel before but it was too saggy. So smart. I clip a reading lamp to the cabinet in the kitchen, fitted with a white bulb, and I use that to direct ‘natural light’ in my dim apartment.
Awesome! Do you happen to have another post exploring different camera options? I’m also a student and food blogger and if I can find a really good camera for food photography at a great price, I will be very happy. 🙂
=Brandon
Awesome! I love the macro filter lens tip! I’m totally getting some of those in my size. No way I can afford a new lens but those will be fun, and for $10, why not? Thanks so much for that tip 🙂 And the props. You’d be surprised what you can find at a dollar store for so cheap. And second hand stores can be awesome too, especially if you just want one of something.
Great tips! Funny you posted this because today I’m actually about to go pick up a small table from my parent’s house for photography purposes. the best natural light is in our formal living room which we don’t use. It’s the only unfurnished room in the house and it’s becoming my photography room now. Instead of using the floor I’ll finally be able to use a table. Poster board is my next purchase 🙂
One other tip I would say is playing around with angles. I like to take the same shot but at different angles or heights. It’s nice to have the options when editing.
What would you suggest if you really have horrible natural lighting. My house is surrounded by trees on all sides. I use a bounce flash (which I know you don’t like) or a tripod, but the lighting still looks bad.
If natural light’s not an option, the next best thing is probably daylight bulbs that simulate natural light in a spotlight. That’s the same that’s usually used for light-boxes.
Great post! I have a cheap folding light box tent with different fabric drops that’s great when I have time and room to get it out. I also like my bright colored plates and bright place mats.
Yay! I’m so glad you got a chance to buy/use the close-up filters! I love mine…especially the x4. 🙂 Great tips…and love the ‘free’ natural light. 😉
After going on many photography workshops and trips to exotic locales, and spending a small fortune on a Canon 5D and a 24-70mm f/2.8 🙂 I can say I am truly in love with my gear..but it’s not all about gear! I wrote a post with tips that discuss that it’s other things than gear that matter more!
http://www.loveveggiesandyoga.com/2011/03/food-styling-props-books-photo-quality.html
Props, reading about photography, paying attention to angles, composition, what’s in the photo, what’s not in the photo, etc…all that matters MORE than gear. Equipment only captures the image; an expensive camera only means it will be captured in higher resolution and detail (and for some people, not a great idea..haha!)
Love your tips..my other tip: thrift stores and antique shops..I get tons of blogging dishes for a buck each and they are adorable and one of a kind!
Great ideas! 🙂 I will have to put posterboard and placemats on my moving list!
Thanks for the tips…I started using the white posterboard tip a couple weeks ago and using the natural light and WOW — much better food shots!
I needed this post, thanks Evan!!!
I think the natural lighting tip is the best, but of course when that’s not available, the placemats are a fabulous idea, or the white poster board. My best tip is to just take about ten photos of each image, that way you’re bound to find one you like, HA!
I bought a long, rectangular white plate/platter and discovered it works perfectly for food photography. Also, if I need to elevate food for a picture, like on a “tablescape” a la Sandra Lee (and I can’t believe I just said that), cloth dinner napkins over boxes are a lifesaver.
Hahaha, the Sandra Lee comment made me laugh out loud
Fantastic! This is exactly what I needed!
This is a really helpful post. I’m always looking for new tricks to make my food pics look better. I need to go buy some posterboard and some more dollar store mats! Thanks!
It’s definitely all about the natural light whenever you can snag it! Just remember whatever you do – keep it to one light source. Having the kitchen light, over the stove light, window light, and whatever else on at the same time led to some dreadful compositions in my early blogging days.
I also use white foam board (bought on sale at Michael’s for 99 cents) and bargain mismatched placemats. And IKEA plates. Love your placemats! I want that bold plaid.
Thank you for all these tips! As a cash strapped try hard blogger, these are all very useful.
Some great ideas. I struggle with making photos look great with my cheap digital, so lens options are probably out, but the background and place mats will certainly help. Thanks!
I remember when using a point and shoot was just “enough” boy have times changed!
I never thought of the dollar store for placemats! I went to the fabric store and bought “fat quarters” (if you don’t know what those are, they are small sheets of fabric used for quilting) and have been using those…just need to get my cat to quit using them for a bed!
awesome post Evan! honestly, I think your pictures far surpass many of those food bloggers with the crazy lenses and dishware.
i’ve had my rebel for over a year and a half now and still am such a novice. It’s a really complex hobby and I wish I could devote more time to it!
Thanks for the tips! I find myself using a lot of these as well, and agree that the natural lighting is especially important to make food look appetizing!
I’ve never heard about those macro lenses! These are all great tips. Thanks so much!
Hey, I’ve shot in my guest bedroom too.
Great tips.
LL
Thanks for the poster board tip!! I always wondered how people got such nice white backgrounds for their photos – duh!!
Thanks for sharing this. Some bloggers don’t even spill what type of camera they use – so I appreciate that you share the tips!
Thanks for the tips. I got to get a set of the filters. I used to have a set with my old camera.
Thanks for sharing these tips. I am going to get white poster board tomorrow!